I believe in Hyper-V!

Romeo MlinarAuthor Archives

Microsoft MVP (Hyper-V) Award the third time in a row

Three years in a row ;)

Every October 1st I have been waiting one very important e-mail from Microsoft and every year I’m excited like the first time when I became an MVP :)

“Dear Romeo Mlinar,
Congratulations! We are pleased to present you with the 2014 Microsoft® MVP Award! This award is given to exceptional technical community leaders who actively share their high quality, real world expertise with others. We appreciate your outstanding contributions in Hyper-V technical communities during the past year.
The Microsoft MVP Award provides us the unique opportunity to celebrate and honor your significant contributions and say “Thank you for your technical leadership.”

MVP_Horizontal_FullColor

I’m honored and proud with this prestigious award. I would like to thank to Microsoft and to Sarah Cooley (Hyper-V PGI Lead) and Ben Armstrong (Virtual PC Guy) as well, to all my dear friends and MVP fellows from around the world. Special thanks to my MVP Lead Yulia Belynina and to my the first MVP Lead Alessandro Teglia.
Big, big, big thanks to my dear friends Marin Franković, Igor Pavleković, Adis Jugo, Nenad Trajkovski, Tomica Kaniški, Charbel Nemnom, Tomislav Lulić, Ognjen Bajic, Bernardin Katić, Tomislav Tipurić, Damir Dizdarević, Omar Kudović, Enis Šahinović, Ekobit’s management, big thanks to my family, my wife and my son for their support and many, many others (sorry guys if I forgot someone. Have no enough space here to mention all of you :) )

Let’s back to work!

Cheers,

Romeo

Automatic Deployment of TeamCompanion through System Center 2012 R2 Configuration Manager

Last week I received a request from one of our customers about the options for automatic deployment of TeamCompanion to end users. In this blog post I would like to explain and show you how this can be achieved using System Center 2012 R2 Configuration Manager. As always, I’ll lead you through the procedure using lots of pictures :) .

Which prerequisite do we need to start our procedure? An Active Directory, the System Center 2012 R2 Configuration Manager, a couple of domain members, and goodwill.
1

Additionally, your developers need to prepare appropriate packages as follows:

1. SQLSysClrTypes.msi (download from here)
2. ReportViewer.msi (download from here)
3. Ekobit.TeamCompanion.Installer.exe
4. TeamCompanionSetup.exe

The order of the packages is important, so please create exactly in the order stated above.

If you don’t know how to create Applications and Packages here is a guide.
1
1

Do the same for the ReportViewer.msi, Distribute Content and Deploy applications.
Now we need to create three TeamCompanion packages with this order:
TeamCompanionInstaller.exe
– TeamCompanionSetup /S /C
(where /S mean silent and /C is for a user)
– TeamCompanion /S
1 
1
1
1 

Do the same for the rest of packages, Distribute Content and Deploy applications.

After you have prepared all this, you are ready to implement your automatic deployment of TeamCompanion

Step 1.

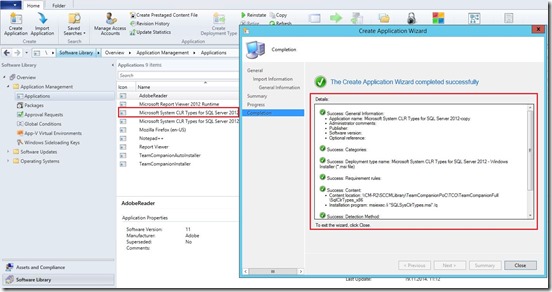
Open the System Center 2012 R2 Configuration Manager console and go to Software Library|Applications and create two applications (Microsoft System CLR Types for SQL Server 2012 & Report Viewer) like in the picture.
2

After you have created Applications, you need to Distribute Content and you need to Deploy applications to the selected clients in the environment.
4

Step 2.

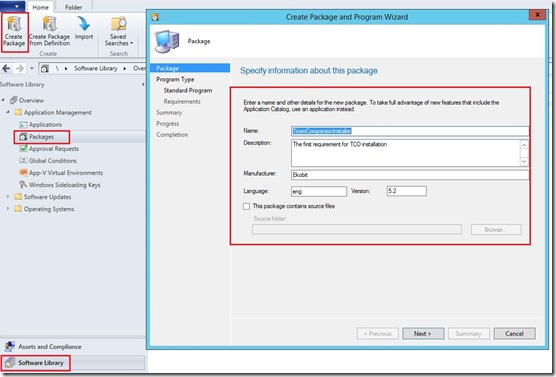
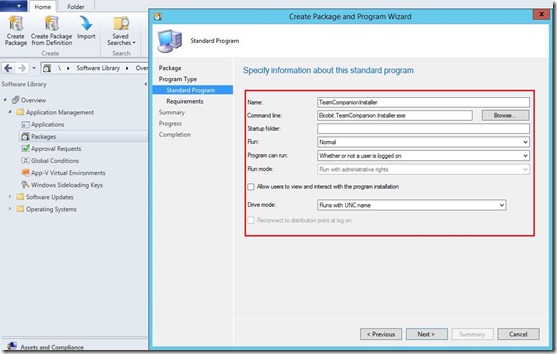
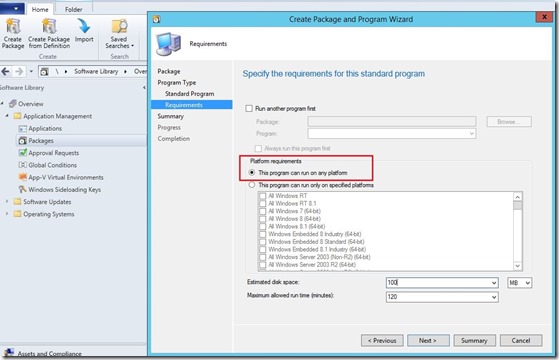
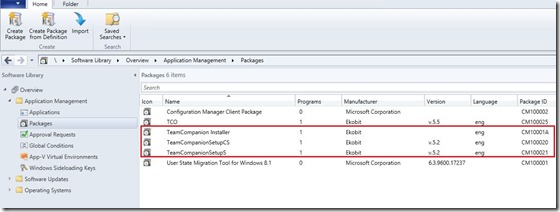
Create three packages (TeamCompanionInstaller.exe, TeamCompanionSetup /S /C and TeamCompanion /S).

3

You are finished on the System Center 2012 R2 Configuration Manager side. Let’s look the client side now!
On the client side, Outlook 2013 and Team Explorer 2013 must be installed to be able to push complete package installation of TeamCompanion.

5

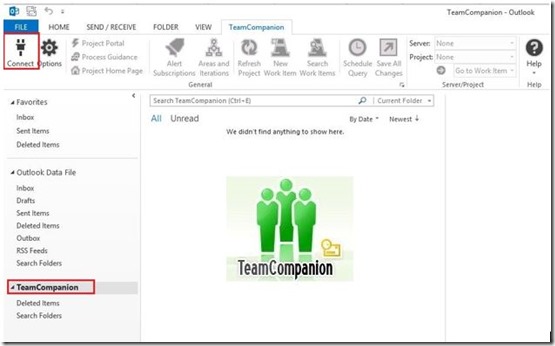
Finally, open Outlook to access TeamCompanion features, connect to your Team Foundation Server and enjoy ;)

TCO1

For more information about TeamCompanion please visit our web page www.teamcompanion.com

Enjoy the day ;)

Cheers,

Romeo

Convert single .VMDK to .VHDX with Microsoft Virtual Machine Converter 2.0 (MVMC)

Hi there,

In the last couple of weeks I was on a vacation and can tell you this vacation was the best in the last ten years :) Now I’m ready for the new challenges!

In this blog post I would like to show how to convert single VMware virtual disk (.VMDK) to Hyper-V (.VHDX) with free tool, Microsoft Virtual Machine Converter 2.0 (MVMC) which you can download from here. Few months ago I wrote blog post on similar topic, but this is a new version of MVMC with lots of new features.

What is Microsoft Virtual Machine Converter (MVMC)?
Microsoft® Virtual Machine Converter (MVMC) is a Microsoft-supported, stand-alone solution for the information technology (IT) pro or solution provider who want to convert virtual machines and disks from VMware hosts to Hyper-V® hosts and Windows Azure™.
New Features in MVMC 2.0
MVMC 2.0 release of MVMC includes the following new features:

  • Converts virtual disks that are attached to a VMware virtual machine to virtual hard disks (VHDs) that can be uploaded to Windows Azure.
  • Provides native Windows PowerShell capability that enables scripting and integration into IT automation workflows.
    Note The command-line interface (CLI) in MVMC 1.0 has been replaced by Windows PowerShell in MVMC 2.0.
  • Supports conversion and provisioning of Linux-based guest operating systems from VMware hosts to Hyper-V hosts.
  • Supports conversion of offline virtual machines.
  • Supports the new virtual hard disk format (VHDX) when converting and provisioning in Hyper-V in Windows Server® 2012 R2 and Windows Server 2012.
  • Supports conversion of virtual machines from VMware vSphere 5.5, VMware vSphere 5.1, and VMware vSphere 4.1 hosts Hyper-V virtual machines.
  • Supports Windows Server® 2012 R2, Windows Server® 2012, and Windows® 8 as guest operating systems that you can select for conversion.

6

As you noticed, with Microsoft Virtual Machine Converter we can convert / migrate to Azure and to Hyper-V but only based VMs only if have vCenter server or ESXi server, but what if I have VMware Workstation based VMs.. cannot convert with MVMC. On that way can convert only .vmdk to .vhdx and then create new Hyper-V VM with converted virtual disk.
So, how to do it?

With PowerShell, of course :) In the previous version of MVMC we could do with CLI.

I know, I know… most of you will tell me; you have lots of free tools for conversion but I want use only Microsoft tools! ;)

Here is short explanation how to…

Install MVMC 2.0 (2.1 ;) ), open PowerShell as administrator and write
get-command -Module mvmccmdlet

Here you can see MVMC modules
1

If you don’t see modules, need to create user profile and to import modules

Create user profile

PS C:\Windows\system32> $env:psmodulepath -split ';'
C:\Users\rm\Documents\WindowsPowerShell\Modules
C:\Program Files\WindowsPowerShell\Modules
C:\Windows\system32\WindowsPowerShell\v1.0\Modules\
PS C:\Windows\system32> $profile
C:\Users\rm\Documents\WindowsPowerShell\Microsoft.PowerShell_profile.ps1
PS C:\Windows\system32>

Now we can convert .vmdk to .vhdx through PowerShell. Open PowerShell as administrator and…

ConvertTo-MvmcVirtualHardDisk -SourceLiteralPath “D:\VMwareConvert\Windows8x64VMware\Windows8x64
.vmdk” -DestinationLiteralPath “D:\VMwareConvert\Windows8x64Hyper-V” -VhdType DynamicHardDisk -VhdFormat Vhdx

3

For a 17GB virtual drive I needed 6 minutes on SSD

4

At the end we can create Hyper-V virtual machine with converted virtual disk.

5

I’d like to thanks my great friend Aleksandar “The PowerShell Guru” Nikolic for the big help.

Also, I must mention a new book “System Center 2012 R2 Virtual Machine Manager Cookbook – Second Edition” from my Hyper-V MVP fellow Alessandro Cardoso.

Hope to see you soon ;)

Cheers,

Romeo