Hi there,
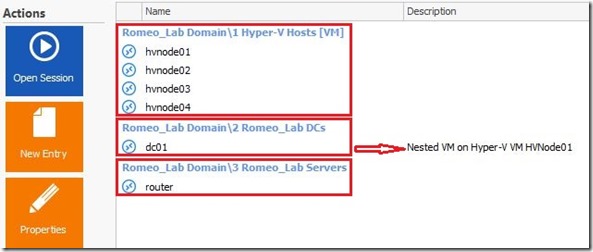
Continuing a series of blog posts with ADDS installation and configuration, how to setup OUs, Security groups and how to join all installed VMs to the AD domain. To remind you, below is the picture with all VMs on the laptop.
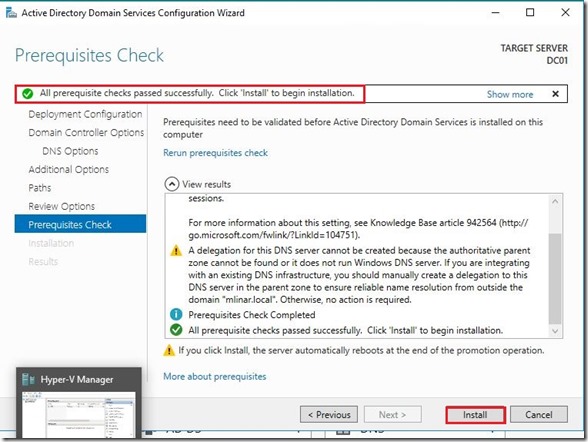
As we can assume, on the DC01 I’ll install ADDS role. Installation of ADDS is pretty stride forward.


Here we are done with a initial installation of Active Directory. Before we go further I’d like to mention one big important things, that is Time synchronization integration service and how to setup Time Server on the Domain Controller.
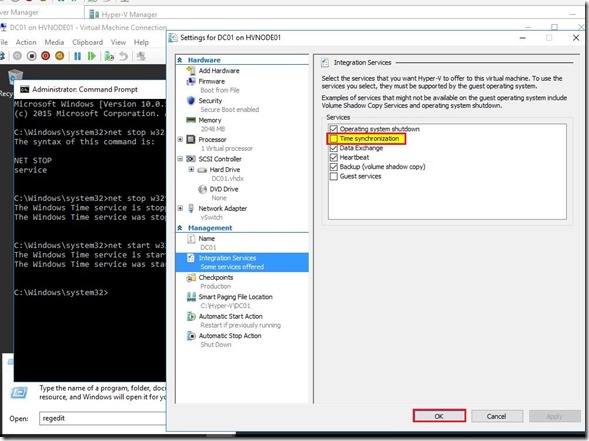
Uncheck Time synchronization under DC vm Settings.
then follow instructions how to configure an authoritative time server, on this link or you can follow instructions below. My recommendation is to use an external time source and fix to yourself.
”Let me fix it myself
To configure an internal time server to synchronize with an external time source, follow these steps:
- Change the server type to NTP. To do this, follow these steps:
- Click Start, click Run, type regedit, and then click OK.
- Locate and then click the following registry subkey:
HKEY_LOCAL_MACHINE\SYSTEM\CurrentControlSet\
Services\W32Time\Parameters\Type - In the pane on the right, right-click Type, and then click Modify.
- In Edit Value, type NTP in the Value data box, and then click OK.
- Set AnnounceFlags to 5. To do this, follow these steps:
- Locate and then click the following registry subkey:
HKEY_LOCAL_MACHINE\SYSTEM\CurrentControlSet\
Services\W32Time\Config\AnnounceFlags - In the pane on the right, right-click AnnounceFlags, and then click Modify.
- In Edit DWORD Value, type 5 in the Value data box, and then click OK.
- Locate and then click the following registry subkey:
- If an authoritative time server that is configured to use an AnnounceFlag value of 0x5 does not synchronize with an upstream time server, a client server may not correctly synchronize with the authoritative time server when the time synchronization between the authoritative time server and the upstream time server resumes. Therefore, if you have a poor network connection or other concerns that may cause time synchronization failure of the authoritative server to an upstream server, set the AnnounceFlag value to 0xA instead of to 0x5.
- If an authoritative time server that is configured to use an AnnounceFlag value of 0x5 and to synchronize with an upstream time server at a fixed interval that is specified in SpecialPollInterval, a client server may not correctly synchronize with the authoritative time server after the authoritative time server restarts. Therefore, if you configure your authoritative time server to synchronize with an upstream NTP server at a fixed interval that is specified in SpecialPollInterval, set the AnnounceFlag value to 0xA instead of 0x5.
3. Enable NTPServer. To do this, follow these steps:
- Locate and then click the following registry subkey:
HKEY_LOCAL_MACHINE\SYSTEM\CurrentControlSet\
Services\W32Time\TimeProviders\NtpServer - In the pane on the right, right-click Enabled, and then click Modify.
- In Edit DWORD Value, type 1 in the Value data box, and then click OK.
4. Specify the time sources. To do this, follow these steps:
- Locate and then click the following registry subkey:
HKEY_LOCAL_MACHINE\SYSTEM\CurrentControlSet\
Services\W32Time\Parameters - In the pane on the right, right-click NtpServer, and then click Modify.
- In Edit Value, type Peers in the Value data box, and then click OK.
Note Peers is a placeholder for a space-delimited list of peers from which your computer obtains time stamps. Each DNS name that is listed must be unique. You must append ,0x1 to the end of each DNS name. If you do not append ,0x1 to the end of each DNS name, the changes that you make in step 5 will not take effect.
5. Select the poll interval. To do this, follow these steps:
- Locate and then click the following registry subkey:
HKEY_LOCAL_MACHINE\SYSTEM\CurrentControlSet\
Services\W32Time\TimeProviders\NtpClient\SpecialPollInterval - In the pane on the right, right-click SpecialPollInterval, and then click Modify.
- In Edit DWORD Value, type TimeInSeconds in the Value data box, and then click OK.
Note TimeInSeconds is a placeholder for the number of seconds that you want between each poll. A recommended value is 900 (decimal). This value configures the Time Server to poll every 15 minutes.
6. Configure the time correction settings. To do this, follow these steps:
- Locate and then click the following registry subkey:
HKEY_LOCAL_MACHINE\SYSTEM\CurrentControlSet\
Services\W32Time\Config\MaxPosPhaseCorrection - In the pane on the right, right-click MaxPosPhaseCorrection, and then click Modify.
- In Edit DWORD Value, click to select Decimal in the Base box.
- In Edit DWORD Value, type TimeInSeconds in the Value data box, and then click OK.
Note
- TimeInSeconds is a placeholder for a reasonable value, such as 1 hour (3600) or 30 minutes (1800). The value that you select will depend on the poll interval, network condition, and external time source.
- The default value of MaxPosPhaseCorrection is 48 hours in Windows Server 2008 R2 or later.
- Locate and then click the following registry subkey:
HKEY_LOCAL_MACHINE\SYSTEM\CurrentControlSet\
Services\W32Time\Config\MaxNegPhaseCorrection - In the pane on the right, right-click MaxNegPhaseCorrection, and then click Modify.
- In Edit DWORD Value, click to select Decimal in the Base box.
- In Edit DWORD Value, type TimeInSeconds in the Value data box, and then click OK.
- Locate and then click the following registry subkey:
- TimeInSeconds is a placeholder for a reasonable value, such as 1 hour (3600) or 30 minutes (1800). The value that you select will depend on the poll interval, network condition, and external time source.
- The default value of MaxNegPhaseCorrection is 48 hours in Windows Server 2008 R2 or later.
7. Close Registry Editor.
8. At the command prompt, type the following command to restart the Windows Time service, and then press Enter:
net stop w32time && net start w32time
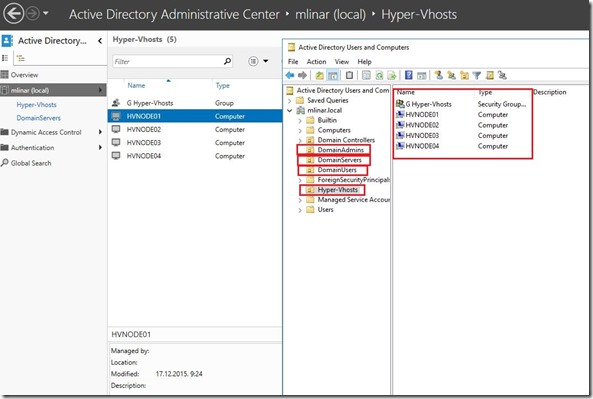
Next step is preparation of Active Directory Users and Computers. As you can see on the pictures below, I’ve created few additional Organizational Units, Groups and Users as well.
On this Domain Controller I have installed DNS and DHCP too!
The next step is joining all virtual machines what I’ve installed to the domain. We have two possibility for that, one by one or with a PowerShell all together. I chose PowerShell.
#add VMs to the domain

Set-Item WSMan:\localhost\Client\TrustedHosts -Value hvnode01, hvnode02, hvnode03, hvnode04, router
 -Concatenate

$LocalCredential = Get-Credential administrator
$DomainCredential = Get-Credential mlinar.local\romeo

Add-Computer -ComputerName hvnode01, hvnode02, hvnode03, hvnode04, router
 -DomainName mlinar.local -Credential $DomainCredential -LocalCredential $LocalCredential
 -Restart -PassThru
We’re done with the essential requirements! The next step in this scenario is the preparation of storage (Storage Spaces Direct), installation and configuration of Failover Clustering feature etc.
Until then enjoy in holidays with your family!
I wish you Merry Christmas and Happy New Year ![]()
Cheers,
Romeo


