I believe in Hyper-V!

Hyper-VCategory Archives

About Hyper-V technology

Prepare Hyper-V virtual machine image for cloning

In one of my previous posts I explained how to Clone a virtual machine with the Virtual Machine Manager, but before Clone our virtual machine we need prepare the virtual machine for cloning.

As you probably know by now, Microsoft-based operating systems use SIDs (Security IDs) that are generated as part of the initial setup of Windows. If you have more than one computer with the same SID, this could cause problems, and cloning a computer (either physical or virtual) without re-generating this SID can cause SID duplication.

Due to the above, we need to prepare virtual machine image for cloning.
This guide assumes that you’ve got some sort of virtualization infrastructure in place. In my case this is a Microsoft Hyper-V. It also assumes that you’ve got some sort of virtualization management tool like System Center Virtual Machine Manager.

In addition, it’s important that you have a basic knowledge about how to set up and run your virtualization product, that you are knowledgeable about setting up virtual machines, and about the proper procedure to install and configure a Windows-based operating system on these virtual machines.

Also, , this guide assumes that you’re knowledgeable about the proper procedures needed to be taken prior to creating a virtual machine clone, how to use SYSPREP (the system preparation tool from Microsoft), and how to create proper answer files for the preparation procedure.

In this post I ‘ll describe how to prepare virtual machine images for Windows Server 2008 R2 and Windows 7.  In Windows Server 2008 R2 and Windows 7 the SYSPREP tool is already included in the operating system, therefore there’s no need to download it like for Windows XP.
To create the proper answer file under Windows Server 2008 R2, Windows 7, you need to either manually edit an existing answer file, or create one for your needs.
To create an answer file for Windows Server 2008 R2 or Windows 7, you must use the tools available in the Windows Automated Installation Kit (AIK) and you can download here.

Preparing the System for Cloning

Prior to cloning the virtual machine there are several steps that you need accomplish. This is not a requirement but is recommended.

  • Log on to the computer as an administrator.
  • Install and customize applications.
  • Customize the Default User profile.
  • Update Windows and other software components.
  • Clean temporary files.
  • Defragment the disk, and compact the VHD file.

Create the UNATTEND.xml Answer File for Windows Server 2008 or Windows 7

Unattended Windows Setup answer file in Windows Server 2008 R2 and Windows 7, is an XML file typically called Unattend.xml. This is the answer file for Windows Setup that is created by using Windows System Image Manager (Windows SIM). The answer file enables the configuration of default Windows settings, as well as the addition of drivers, software updates, and other applications.
The unattended Windows Setup answer file in Windows Server 2008 R2 and Windows 7 needs to be specified during the running of SYSPREP. To do so, run the SYSPREP tool with the /unattend:filename option.

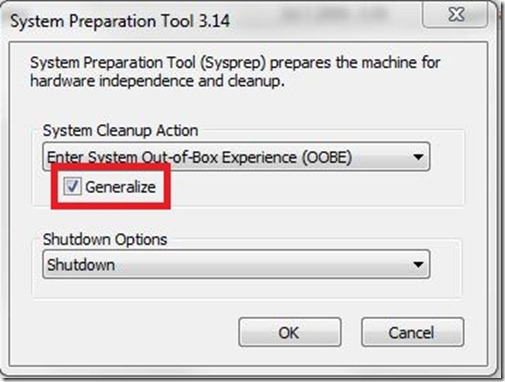
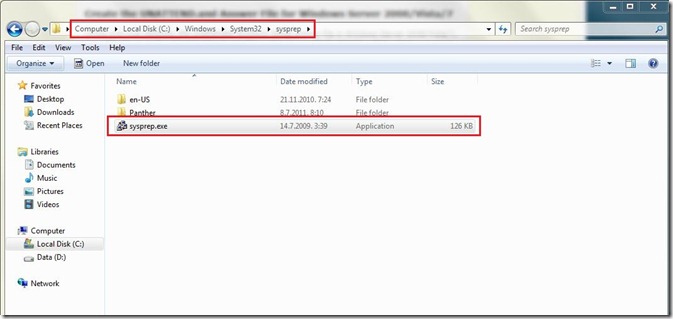
If you wish to manually configure the Windows settings after SYSPREP, run SYSPREP from the C:\Windows\System32\sysprep folder.

1

Make sure you do NOT FORGET to select the “Generalize” option if you need to change the computer’s SID. It seems that this version will NOT change the SID unless you pick that option.

2

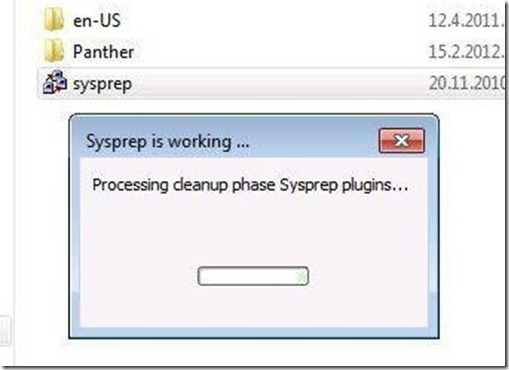
Sysprep is working.

3

When the process is complete the virtual machine will shut down.

OK, our VM is prepared for Cloning and if you want to know how to Clone VM with System Center Virtual Machine Manager read my previous post about that.

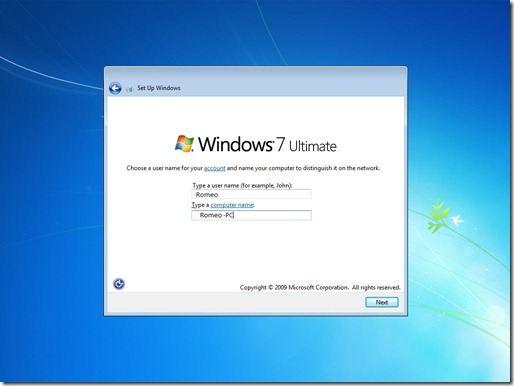
After starting cloned machine, you will be prompted to configure few settings like the user name, computer name, language and some other settings.

4

I need to mention, creating an answer file will greatly ease this process, and the entire process will automatically run.

Folks that’s it!
VM failed to start – Unable to allocate Ram: insufficient system resources – Error 0x800705AA

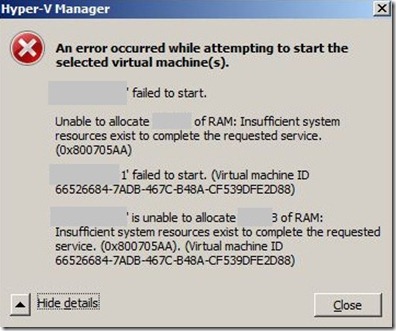
My Hyper-V virtual machines are working well until yesterday. I had a problem with starting Hyper-V virtual machines in my lab environment. I tried to start one of my few VM’s and I got the following error:

MachineName failed to start
Unable to allocate 4 GB of Ram: insufficient system resources exist to complete the request service (0x800705AA)

1

I spent few hours try to resolve this issue.

  • Disabled all software running on the server (this software was running before)
  • Uninstall all software I can.
  • Check online for similar issues.
  • Modified the cached physical memory reservation (using the registry key), to increase free physical memory.
  • Change memory assignment on VM to dynamic.
  • Applied few hotfixes (KB983289 and KB979149)
  • Check the event viewer for more info
  • Verify I have enough space on all disk partitions
  • Delete all snapshots
  • Export and Import VM
  • Create new VM etc…

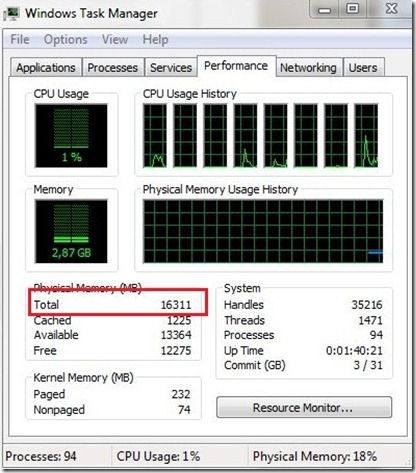
As you can see below there are plenty of memory available on my laptop.

2

Where is the catch?

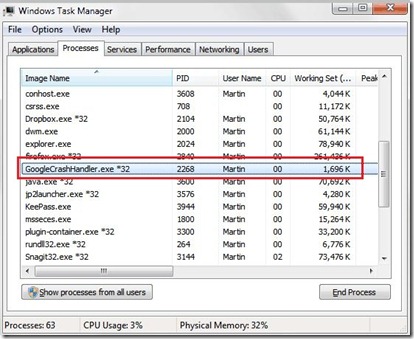
It’s a Google background program called GooglecrashHandler.exe. If you have that active on your system, that’s what is doing it and you should disable it.
This is a pretty new problem that just started showing up recently.

3

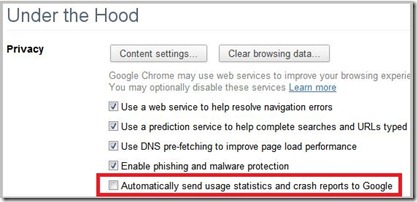
As described here – http://www.ghacks.net/2011/05/16/googlecrashhandler-exe-process-update/, the 2 GoogleCrashHandler.exe processes run because you have accepted the Google’s default setting to „Automatically send usage statistics and crash reports to Google“ in some of your installed Google aps. In Chrome, for example, this option can be turned off in Options–>Under The Hood.

4

Additional notice:

If you access your Hyper-V Server using RDP and you never logout of your RDP session to the Hyper-V Server management OS over the time your user session will continue to consume more and more RAM. The way to prevent this is to logout of your remote session (and make a practice of it) instead of always disconnecting. This would also clean up background processes such as this google thing.

Many thanks to Bob Comer, Brian Ehlert and my colleague Ana Roje Ivančić.

I hope that can help you to resolve the same issue with your virtual machines.

That’s it for today. Enjoy Winking smile

Clone Virtual Machine with Virtual Machine Manager

Today I had to Clone a virtual machine in my production environment and I would like to explain how it works. This is a simple procedure with few steps and the whole procedure will be explained as always with many pictures. Before the cloning of virtual machine image you have to prepare the System for Cloning.

As you probably know by now, Microsoft-based operating systems use SIDs (Security IDs) that are generated as part of the initial setup of Windows. If you have more than one computer with the same SID, this could cause problems, and cloning a computer (either physical or virtual) without re-generating this SID can cause SID duplication.

How to prepare the system for cloning I will write in another post.

Step 1.

You must first shutdown virtual machine which you want to Clone. When your VM is turned off, right click on VM and choose Clone.

1

At the second step choose new name for your new virtual machine.

2

On the Configure Hardware field if you need the same hardware configuration like previous VM leave hardware configuration by default or edit what you need.

3

At the next step you need to choose where you want to deploy the virtual machine. I chose “Place the virtual machine on a host”

4

At the next screen I chose host on which was located the previous virtual machine.

5

Select virtual machine path…

6

Specify virtual network…

7

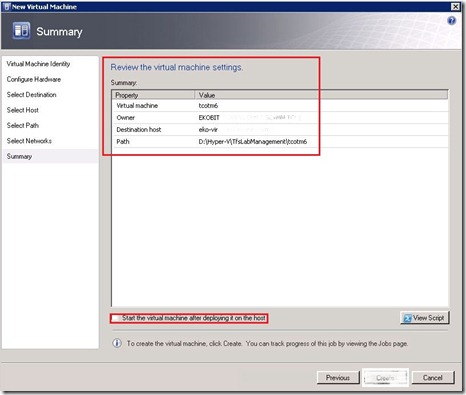
At the end review the virtual machine settings. If you want to start cloned virtual machine immediately check mark “Start the virtual machine after deploying it on the host”  and click Create.

8

The process started.

9

When the process is finished we have two of the same virtual machines whit the same settings.

10

Before you turn on both virtual machines you need to rename the new one. How to do that, especially if your vm’s are in the domain,  I‘ll describe this in my next post.

Until then have a nice week!