I believe in Hyper-V!

Hyper-VCategory Archives

About Hyper-V technology

Black screen when opening Virtual Machine Connect

Hi to all,

Long time no see. I had a lots of work in the last couple of months and didn’t have time to write something smart Smile. I have a bunch of posts in queue and now one of them need to be published. Today I had issue with login on one of my local virtual machines.

I have a few of virtual machines on my lab with no connection to outside world and because of that when you try to connect to virtual machine, will see black screen and need to wait couple of seconds to see login screen.

To avoid this we can do as follows:

– Connect your system to the Internet and open VM Connect ONCE!
– Tell Windows to not attempt to update the root certificate by running these command in PowerShell:

New-Item -Path HKLM:\SOFTWARE\Policies\Microsoft\SystemCertificates\AuthRoot
New-ItemProperty -Path HKLM:\SOFTWARE\Policies\Microsoft\SystemCertificates\AuthRoot -Name DisableRootAutoUpdate -PropertyType DWord -Value 1 –Force

I found this solution on Ben’s blog “Delay when opening VM Connect on disconnected systems” . If you want see more, please read his post.

Cheers,

Romeo

Convert/Copy the content of pass-through disks to .VHDX file format

Hi there,

In this blog post I’d like to show you how to convert, copy the content of past-through disk to virtual hard disk, .VHDX.
I’ll not write about differences between those two disk format, will only show you how to simple convert. To be honest, this post is note for me Open-mouthed smile.

So, let’s start, step by step.

  1. Ensure that you shut down the virtual machine that is connected to the pass-through disk.
  2. Make sure you have sufficient hard disk space to store the new VHDX file when it is converted.
  3. Open Hyper-V Manager console.
  4. Select the virtual machine with the pass-through physical hard disk.
  5. In the action pane, click New, and then click Hard Disk.
  6. The New Virtual Hard Disk Wizard appears. Click Next.
  7. Click .VHDX, and then click Next.
  8. Choose which disk type you want, Dynamically expanding or Fixed size, and then click Next. Usually I choose Dynamic virtual disk.
  9. Specify the Name and Location of the new .VHDX file, and then click Next.
  10. Click Copy the contents of the specified physical disk.
  11. Click the name of the appropriate offline physical hard disk from the available physical hard disks, and then click Next.
  12. Click Finish.
  13. At the end, remove pass-trough disk from the virtual machine and add new .VHDX

  14. Start virtual machine and enjoy Winking smile

  15. The contents of the pass-through disk or the direct-attached storage disk will be converted to the .vhdx file format. This might take some time depending on the size.
    For example: For 1.2TB pass-trough disk I needed almost seven hours on the SAS 15K disk drives.

    NOTE: Keep in mind that your virtual machine will be unavailable during the convert/copy process.

    Source: Technet

    image

    Cheers,

    Romeo

Find Hyper-V VM’s host name

Hi,

Long time no see Winking smile. In the last couple of weeks, to be honest, even months I have been to busy with lots of great projects and didn’t have a time to write something new Sad smile. This time I’ll also write something old but very useful! Few months ago I worked in small environment with couple of hundreds virtual machine and knew every name of virtual machines, IP addresses and where my virtual machines are. Since January I have been working in the large IT environment with thousand of Hyper-V virtual machines and now I have problem finding a host of virtual machines!
We have a two ways to find that.
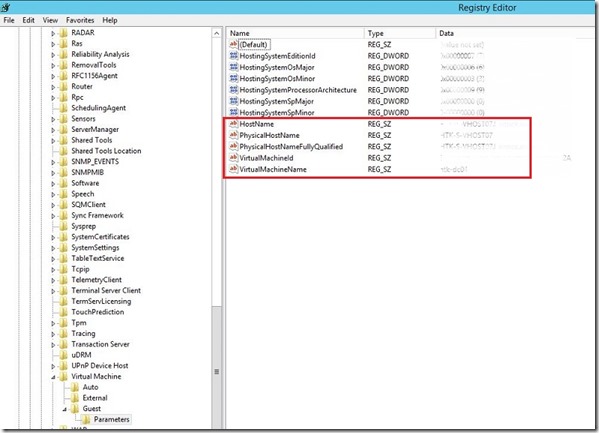
1. On the virtual machine open registry; run—>regedit

image

Under this you will find who is your virtual machine host.

regedit

2. And the faster way, use PowerShell. Open PowerShell as administrator and run command below:
(get-item “HKLM:\SOFTWARE\Microsoft\Virtual Machine\Guest\Parameters”).GetValue(“HostName”)

Capture

image

Cheers,

Romeo