In this blog post I’ll describe how to install Hyper-V Server 2012 from a USB stick.
Hyper-V Server 2012 is the free version of Hyper-V and it offers almost all the components and features that are available in Windows Server 2012 with Hyper-V role installed.
This is very nice scenario if you want have your Hyper-V on USB stick wherever you go.
In my scenario, I have Kingston Ultimate 16GB USB stick and I’ll be install Hyper-V Server 2012 on it.

The computer which is to run the Hyper-V needs to support boot from USB and all the Hyper-V pre-requisites, like VT, etc…
First you need to install the Windows Assessment and Deployment Kit (ADK) for Windows 8 (Former WAIK). You can download ADK from here.
Also, need to install .NET Framework 3.5 or newer version, and you need prepare Hyper-V Server 2012 installation.
When you are ready, open the Hyper-V Server 2012 image file, navigate to the Sources folder, and copy the Install.wim file to a local folder on your computer.
Prepare USB flash drive to create a bootable Hyper-V Server 2012.
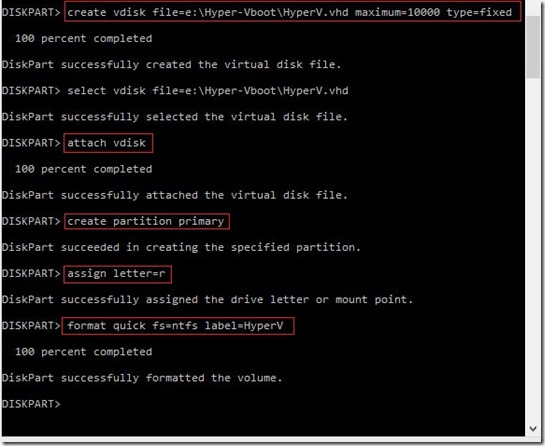
Open the command prompt as an administrator to create the VHD file.
Create “boot” folder, for example Hyper-Vboot,

and the VHD file named Hyper-V.vhd with 10GB capacity, attach vdisk, create primary partition, assign letter, format disk, etc…
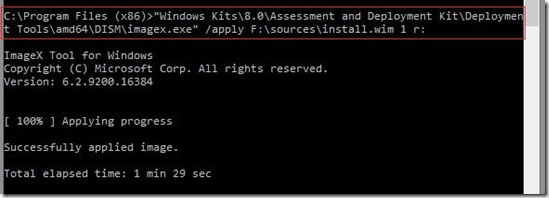
Apply a Hyper-V Server 2012 image
After creating the VHD file, you can apply the Hyper-V Server image using the Install.wim like in picture below.
Use the DiskPart tool to detach the virtual disk from your computer after applying the image.

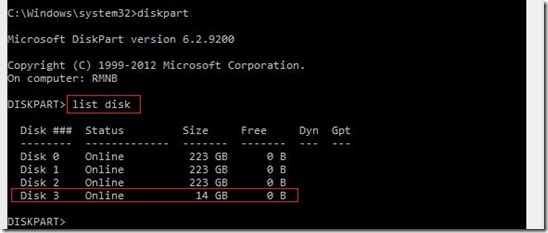
Now you can attach the USB stick you want to use to be formatted and to receive the VHD file created in the previous step.
Use the DiskPart tool again to identify the USB stick disk number (UFD).
Select, clean, create partition and format the volume…
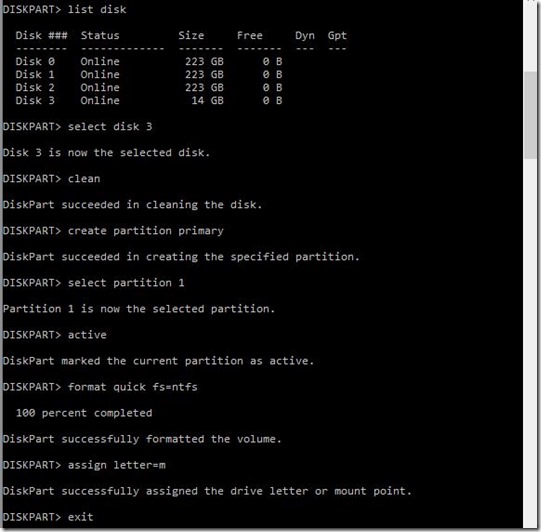
Copy created VHD file to the M: drive where the USB stick is attached.

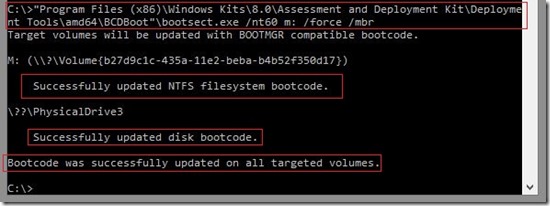
Use the BootSect tool to update the master boot code on the UFD to be compatible with Bootmgr.
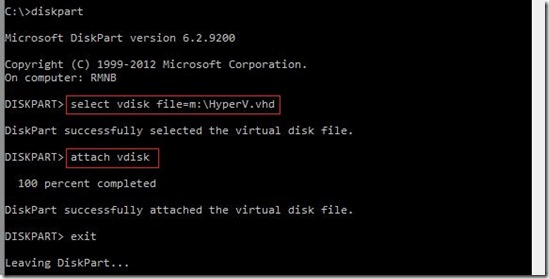
Use the DiskPart tool again to attach the VHD file to the M: drive.
Use the BCDboot tool to copy the necessary boot files so that you can boot your USB stick.

Disable paging & detach VHD
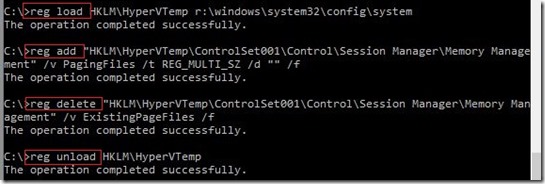
Paging may cause the flash device to wear out sooner. Disable paging prior to deploying the UFD. Use the following commands to load, clear, delete and unload the registry from VHD file:
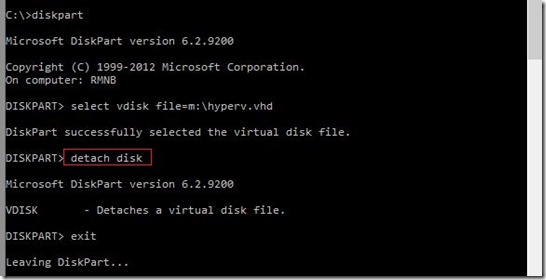
Detach the VHD
At a command prompt, type:
Now you can remove the USB stick from your computer and attach it onto another computer to boot Hyper-V Server 2012. You may need to change the boot order from your computer BIOS.
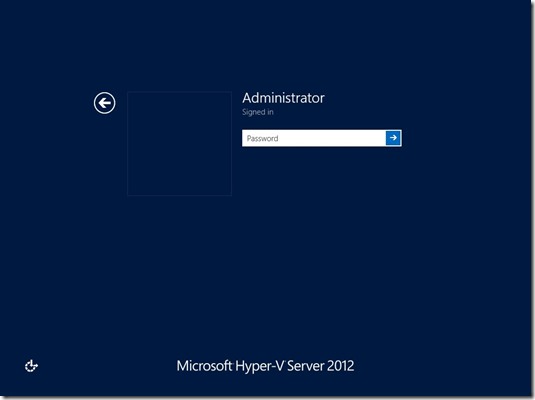
At the first boot up, your bootable Hyper-V Server 2012 will be loaded and the system will prompt you to enter the new administrator password.
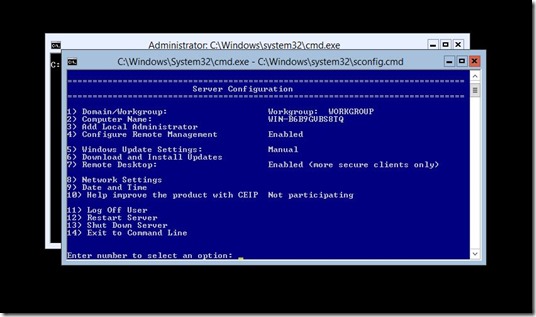
After the first login, Hyper-V Server 2012 will load the SConfig tool, allowing you to change settings using command-line interface. You can set up Hyper-V Server 2012 and enable remote administration to manage it, using Hyper-V Manager console from another computer.
I hope this will helpful!
Aidan Finn, thank you for reminding me for this ;)
Very important NOTE:
Quote from Aidan Finn’s blog: “Please pay careful attention: It refers to the free product Hyper-V Server 2012. No where, I repeat … NO WHERE does it say that Windows Server 2012 Hyper-V is supported on USB. It’ll be entirely your fault if you assume that you have support to install Windows Server 2012 on USB and enable Hyper-V. The TechNet text only mentions Hyper-V Server 2012 and that is a different product.
If you follow the link to the USB instructions (which are dated for Hyper-V Server 2008 R2) you will see another important sentence:
The scenario described in this document is only supported for original equipment manufacturers (OEM).
In other words, it is OK for Dell, HP, etc, to install Hyper-V Server 2012 on a USB stick and ship it to you. It is not supported if you do this for yourself. The instructions are there; you can use them to build yourself a lab that runs from USB. And that’s that. Do not go building this for yourself for production support. You have been warned.”
At the end I’d like to thanks my Virtual Machine MVP fellow Lenardo Carvalho, author of the book Windows Server 2012 Hyper-V Cookbook who helped me a lot with this great and amazing book.
Thank you mate ;)

This is my last blog post for this year. See you again in 2013. ;)
I wish you a Merry Christmas and a Happy New Year!
(and happy VIRTUALIZATION :) )


