I believe in Hyper-V!

RecoveryCategory Archives

VM failed to start – Unable to allocate Ram: insufficient system resources – Error 0x800705AA

My Hyper-V virtual machines are working well until yesterday. I had a problem with starting Hyper-V virtual machines in my lab environment. I tried to start one of my few VM’s and I got the following error:

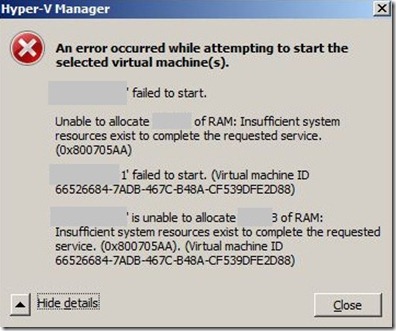
MachineName failed to start
Unable to allocate 4 GB of Ram: insufficient system resources exist to complete the request service (0x800705AA)

1

I spent few hours try to resolve this issue.

  • Disabled all software running on the server (this software was running before)
  • Uninstall all software I can.
  • Check online for similar issues.
  • Modified the cached physical memory reservation (using the registry key), to increase free physical memory.
  • Change memory assignment on VM to dynamic.
  • Applied few hotfixes (KB983289 and KB979149)
  • Check the event viewer for more info
  • Verify I have enough space on all disk partitions
  • Delete all snapshots
  • Export and Import VM
  • Create new VM etc…

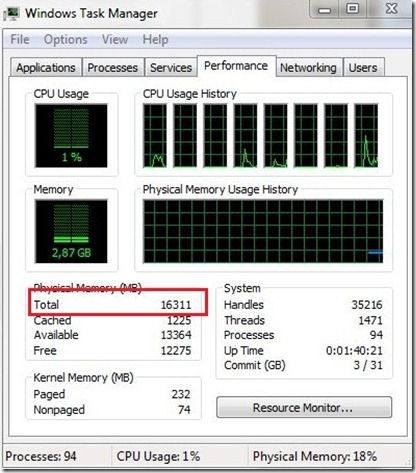
As you can see below there are plenty of memory available on my laptop.

2

Where is the catch?

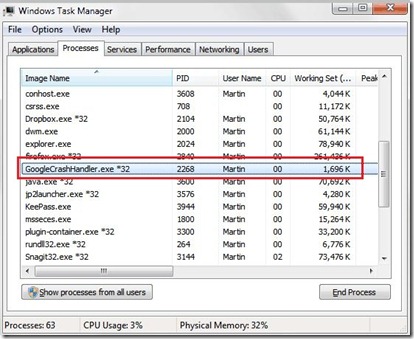
It’s a Google background program called GooglecrashHandler.exe. If you have that active on your system, that’s what is doing it and you should disable it.
This is a pretty new problem that just started showing up recently.

3

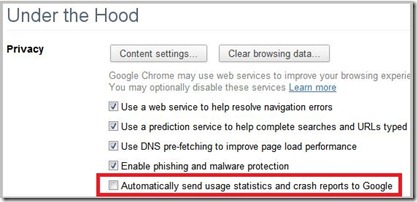
As described here – http://www.ghacks.net/2011/05/16/googlecrashhandler-exe-process-update/, the 2 GoogleCrashHandler.exe processes run because you have accepted the Google’s default setting to „Automatically send usage statistics and crash reports to Google“ in some of your installed Google aps. In Chrome, for example, this option can be turned off in Options–>Under The Hood.

4

Additional notice:

If you access your Hyper-V Server using RDP and you never logout of your RDP session to the Hyper-V Server management OS over the time your user session will continue to consume more and more RAM. The way to prevent this is to logout of your remote session (and make a practice of it) instead of always disconnecting. This would also clean up background processes such as this google thing.

Many thanks to Bob Comer, Brian Ehlert and my colleague Ana Roje Ivančić.

I hope that can help you to resolve the same issue with your virtual machines.

That’s it for today. Enjoy Winking smile

Windows service does not want to start under a domain user account

For many reasons we must run some Windows services under a specific user account. Because of that we sometimes have a problem with starting those services when we reboot the server. Service does not want to start regardless of the Automatic startup type. Why? In this post I would like to explain how to resolve that issue.

For example:

In my environment I have one service account (mydomain\TfsTestLabManagement) for few services on Team Foundation Server. One of those services is Visual Studio Test Controller service which is running under mydomain\TfsTestLabManagement  domain account and is set to Automatic start.
I added that account in the Log on as a service under  Default Domain Policy. When I reboot the TFS server service does not want to start. Because of that I need to start service manually and every time I need to enter password and click Start.

Wrong configuration:

2

When you put Automatic start under Startup Type the service does not want to start and you need manually start the service.

What you need to do.

Step 1.

Add service account in the Log on as a service in Default Domain Policy.

1

Step 2.

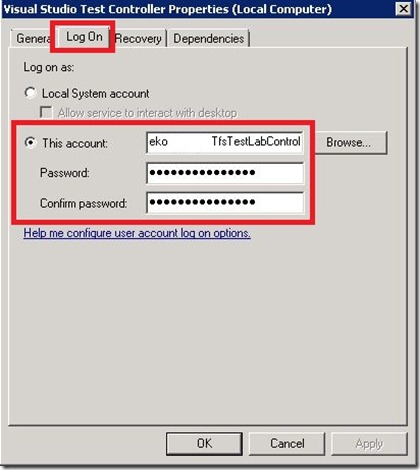
On the server under the Services in the Log On tab add service account.

4

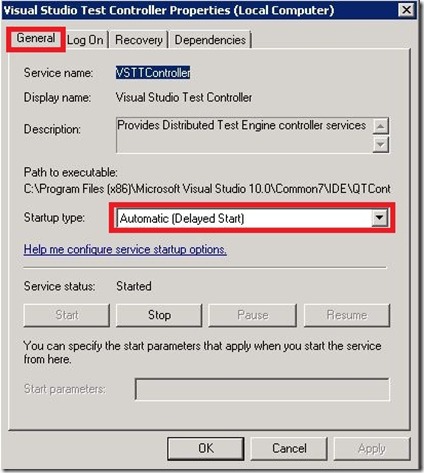
Step 3. the last and the most important step! Under the General tab Startup Type: choose Automatic (Delayed Start) like in picture below.

5

Next time when you reboot the server, service will start automatically. The catch was only in Automatic (Delayed Start) Startup Type.

That’s it for today.

Deploying DaRT to the PC (Adding DaRT to the Boot Menu)

Deploying the DaRT image in a recovery partition to each PC means you always have the right DaRT image when you need it for each PC. That means if you have Windows 7 x64 you need DaRT image created only for Windows 7 x64. DaRT can be placed in its own partition or over the top of the WinRE recovery partition for F8.

In this post I would like to describe how to manually deploy DaRT image to the Boot Menu on your PC’s or laptops. As always I will describe entire procedure through lots of pictures.
This is a very simple procedure, and I hope it will help someone.

First of all create your DaRT ISO image with the desired settings and files.

1

Create a partition on the target PC equal to or greater than the size of your DaRT ISO. The size of the DaRT ISO has approximately 210 MB for Windows 7.
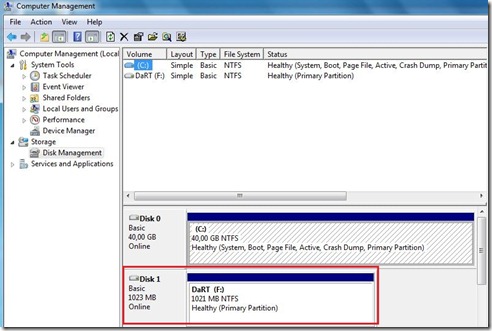
In my scenario, I created \F: partition with 1GB size.

2

Extract the files from the DaRT ISO and copy them to your target partition, also on the target partition create folder named Windows\System32  and from C:\Windows\System32 copy winlogon.exe to that folder. Just like on the pictures below.

3
4

OK, now follows the most important part!
Create script with relevant command line. In my scenario follow the script described below.

bcdedit /create {ramdiskoptions} /d “IT Pro UG DaRT Demo”
bcdedit /set {ramdiskoptions} ramdisksdidevice partition=F:
bcdedit /set {ramdiskoptions} ramdisksdipath \boot\boot.sdi
bcdedit /create /d “IT Pro UG DaRT Demo” /application OSLOADER –>Record the GUID returned from this command
bcdedit /set {GUID} device ramdisk=[F:]\sources\boot.wim,{ramdiskoptions}
bcdedit /set {GUID} path \windows\system32\winload.exe
bcdedit /set {GUID} osdevice ramdisk=[F:]\sources\boot.wim,{ramdiskoptions}
bcdedit /set {GUID} systemroot \windows
bcdedit /set {GUID} winpe yes
bcdedit /set {GUID} detecthal yes
bcdedit /displayorder {GUID} /addlast
bcdedit /timeout 20

Type the script in notepad and save it as “DaRT.bat”. This is an automated script.

If you want to run script manually open command prompt and type command lines described below.

bcdedit /copy {current} /d “IT Pro UG Dart Demo”
bcdedit /set {GUID} device vhd=[G:]\sources\boot.wim
bcdedit /set {GUID} osdevice vhd=[G:]\sources\boot.wim
bcdedit /set {GUID} detecthal on
bcdedit /timeout 20

If you want to know more about how to configure Boot Configuration Data follow this link.

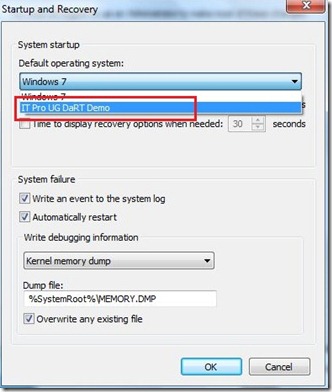
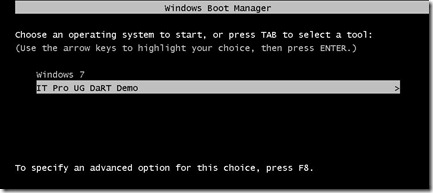
At the end you have new boot entry on your PC or laptop.

5 

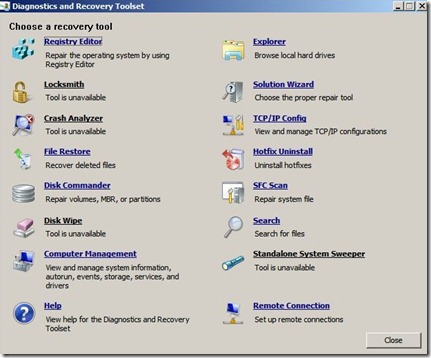
If you need repair your or users PC’s or laptops, restart the machine end boot from your newly created recovery partition.

6
7

In rare support scenarios where the hard drive is severely damaged (eg. MBR failure), booting from the hard drive image of DaRT is not an option and a CD/DVD or USB will need to be used.

In one of the following posts I will describe how to use a Remote Connection with the DaRT7 and which all features we have for that scenario.

That’s it for today!