I believe in Hyper-V!

Windows ServerCategory Archives

System Center 2012 – Virtual Machine Manager

This year Microsoft release a new palette System Center 2012 products. Virtual Machine Manager is probably the System Center 2012 product with the most significant updates.
There are a lots of updates in Virtual Machine Manager 2012 to mention them all, but here are few of the most important enhancements.

Virtual Machine Manager 2012 – New features

Virtual Machine Manager 2012 new features can be divided in four segments as shown on picture below:

1

1. Infrastructure enhancements

Highly Available VMM server. As Virtual Machine Manager is core of management infrastructure for virtual environment it is really important for this infrastructure to be highly available in todays big datacenters.

2. Fabric Management

Virtual Machine Manager 2012 can now manage even more hypervisors: Hyper-V, VMWare and Citrix XenServer. Also it can integrate with remote management such as iLO and SMASH. One interesting thing here is also ability for bare metal provisioning meaning that with Virtual Machine Manager 2012 you can provision Hyper-V even on bare metal computers without much manual work. Cluster creation with storage provisioning is also one of the interesting new features. Regarding the network management enhancements, Virtual Machine Manager 2012 can now integrate with load balancers. Besides that now you can also assign IP and MAC from pools. Dynamic Optimization and new Power Management features are also important updates as described in Cool Features.

3. Cloud Management

Virtual Machine Manager can now abstract server, network and storage resources into private clouds, delegate access to private clouds with control of capacity, capabilities and user quotas. Also now it is rather easy to enable self-service usage for application administrator to author, deploy, manage and decommission applications in the private cloud.

4. Service Management

With Virtual Machine Manager 2012 you can now define service templates to create sets of connected virtual machines, OS images and application packages. Maybe the most important feature in service management is ability to leverage great and power full technologies like Server Application Virtualization (Server App-V).

Virtual Machine Manager 2012 – Cool Features

1. Support for cloud, fabric, and services management

Virtual Machine Manager 2012 has moved into the cloud and services management space. VMM 2012 adds cloud support, where the Cloud is defined as a collection of resources that can be assigned to users or groups. The cloud is composed of a Fabric, which is the underlying IT infrastructure, and Services, which are collections of virtual machines (VM’s) that perform a given task.

2. Dynamic Optimization

The addition of Dynamic Optimization is Microsoft’s answer to VMware’s Distributed Resource Scheduler. Dynamic Optimization provides cluster-level workload balancing for VM’s. Like the older VMM Performance and Resource Optimization (PRO) feature, Dynamic Optimization lets VMM analyze workloads and dynamically move VM’s to different hosts by using Live Migration. Unlike PRO, Dynamic Optimization doesn’t require Operations Manager. The PRO feature will still be available in Virtual Machine Manager 2012.

3. Power Optimization

A feature closely related to Dynamic Optimization is the ability to optimize the placement of VM’s to minimize power consumption. Power Optimization in Virtual Machine Manager 2012 can use Live Migration to consolidate running VM’s onto fewer virtualization hosts, then power down the unneeded hosts.

4. Enhanced placement rules

Intelligent Placement enabled the previous version of Virtual Machine Manager to evaluate host capacity and suggest the most appropriate virtualization hosts for deployment. Virtual Machine Manager 2012 extends this capability with over 100 virtual machine placement checks and also adds support for custom placement rules. In addition, Virtual Machine Manager 2012 supports multiple virtual machine deployments as services.

5. Upgrade support

Nice feature in Virtual Machine Manager 2012 is the ability to perform in-place upgrades from existing Virtual Machine Manager 2008 R2 with SP1 installations. Customers will be able to upgrade from Virtual Machine Manager 2008 R2 with SP1 to the Virtual Machine Manager 2012 RC, and then upgrade from the Virtual Machine Manager 2012 RC to the final RTM release of Virtual Machine Manager 2012.

6. Bare-metal Hyper-V provisioning

Another new feature in Virtual Machine Manager 2012 is the ability to perform bare-metal provisioning of Hyper-V servers. This feature lets Virtual Machine Manager create new Hyper-V hosts on bare-metal systems by using predefined templates.
Virtual Machine Manager 2012 is also integrated with remote management technologies such as iLO (HP’s Integrated Lights Out) and SMASH (Systems Management Architecture for Server Hardware).

7. Manage multiple hypervisors

Virtual Machine Manager 2012 is able to manage all the major virtualization platforms. In Virtual Machine Manager 2008 R2, Microsoft added the ability to manage VMware’s vSphere Server via vCenter Server. With the release of Virtual Machine Manager 2012, Microsoft is adding the ability to manage Citrix XenServer. Microsoft Virtual Server 2005 and ESX 3.0 is not supported.

8. Cluster awareness

At the previous version of Virtual Machine Manager we did not have a cluster-aware application. Virtual Machine Manager 2012 is cluster aware and can be installed on a Windows Server 2008 R2 failover cluster, giving Virtual Machine Manager 2012 improved availability and the ability to fail over to a backup node in the event of a server failure.

9. PowerShell 2.0

Virtual Machine Manager provides PowerShell cmdlets for command-shell management, and actions in the Virtual Machine Manager console can be used as a basis for generating PowerShell management scripts. Virtual Machine Manager 2012 enhances this management capability with full support for PowerShell 2.0.

There are much more enhancements in System Center 2012-Virtual Machine Manager. Check them on technet and start your journey to the Cloud.

I can’t wait RTM, this would be/is a great product from Microsoft System Center team Winking smile.

How to reserve a memory for the Hyper-V host and what is a Hyper-V Dynamic Memory

For those who read my blog posts and who don’t know how to reserve memory for the Hyper-V hosts this is a quick guide. This is not new, but today I had this situation and I want to share with you.

First off all I would like to explain what is a Hyper-V Dynamic Memory.

Dynamic Memory is a Hyper-V feature that helps you use physical memory more efficiently. With Dynamic Memory, Hyper-V treats as a shared resource that can be reallocated automatically among running virtual machines. Dynamic Memory adjusts the amount of memory available to a virtual machine, based on changes in memory demand and values that you specify. Here, I’m talking about Hyper-V Dynamic Memory feature in a Windows Server 2008 R2 (Hyper-V role) and Microsoft Hyper-V Server 2008 R2.
Before this feature was introduced, changing the amount of memory available to a virtual machine could be done only when the virtual machine was turned off. With Dynamic Memory, Hyper-V can provide a virtual machine with more or less memory dynamically in response to changes in the amount of memory required by the workloads or applications running in the virtual machine. Hyper-V can distribute memory more efficiently among the running virtual machines configured with Dynamic Memory.
Depending on factors as workload, this efficiency can make it possible to run more virtual machines at the same time on one physical server.

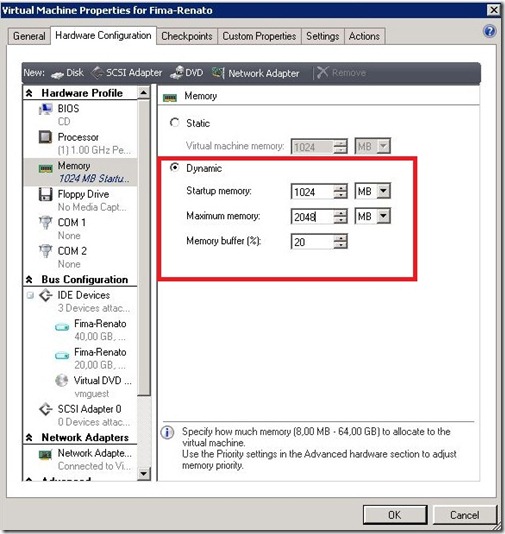
This is how it looks like when we open virtual machine properties through Virtual Machine Manager.

dynamicmemory

But, there is always a but…you could have a problem with memory on your Hyper-V host.
For example; You have a Hyper-V host with 48GB of RAM and 11 virtual machines with 4GB Static RAM assigned. You still have 4GB of RAM reserved for Hyper-V host, but when you have a Dynamic Memory environment, you could give each virtual machine 6GB of RAM. That RAM would be dynamically changed based on virtual machines needs. If virtual machines have a big load, they could grab all RAM leaving your Hyper-V host without RAM.

To avoid this problem you need to reserve RAM for the Hyper-V host. How to do that? Very simple. You need to add some registry values on your Hyper-V host.

Open registry and enter a new REG_DWORD value.

– HKEY_LOCAL_MACHINE\SOFTWARE\Microsoft\Windows NT\CurrentVersion\Virtualization

– Add New—>DWORD (32-bit) Value

– Name it –> MemoryReserve

– Under Decimal specify the amount of RAM for the Hyper-V host in MB (recommend minimum 2GB of RAM) and restart the Hyper-V host.

2

My recommendation! Use Dynamic Memory environment only for irrelevant services, like testing environment. Do not use Dynamic Memory environment for your production VM’s.

That’s all for today! Have a nice weekend Smile

Prepare Hyper-V virtual machine image for cloning

In one of my previous posts I explained how to Clone a virtual machine with the Virtual Machine Manager, but before Clone our virtual machine we need prepare the virtual machine for cloning.

As you probably know by now, Microsoft-based operating systems use SIDs (Security IDs) that are generated as part of the initial setup of Windows. If you have more than one computer with the same SID, this could cause problems, and cloning a computer (either physical or virtual) without re-generating this SID can cause SID duplication.

Due to the above, we need to prepare virtual machine image for cloning.
This guide assumes that you’ve got some sort of virtualization infrastructure in place. In my case this is a Microsoft Hyper-V. It also assumes that you’ve got some sort of virtualization management tool like System Center Virtual Machine Manager.

In addition, it’s important that you have a basic knowledge about how to set up and run your virtualization product, that you are knowledgeable about setting up virtual machines, and about the proper procedure to install and configure a Windows-based operating system on these virtual machines.

Also, , this guide assumes that you’re knowledgeable about the proper procedures needed to be taken prior to creating a virtual machine clone, how to use SYSPREP (the system preparation tool from Microsoft), and how to create proper answer files for the preparation procedure.

In this post I ‘ll describe how to prepare virtual machine images for Windows Server 2008 R2 and Windows 7.  In Windows Server 2008 R2 and Windows 7 the SYSPREP tool is already included in the operating system, therefore there’s no need to download it like for Windows XP.
To create the proper answer file under Windows Server 2008 R2, Windows 7, you need to either manually edit an existing answer file, or create one for your needs.
To create an answer file for Windows Server 2008 R2 or Windows 7, you must use the tools available in the Windows Automated Installation Kit (AIK) and you can download here.

Preparing the System for Cloning

Prior to cloning the virtual machine there are several steps that you need accomplish. This is not a requirement but is recommended.

  • Log on to the computer as an administrator.
  • Install and customize applications.
  • Customize the Default User profile.
  • Update Windows and other software components.
  • Clean temporary files.
  • Defragment the disk, and compact the VHD file.

Create the UNATTEND.xml Answer File for Windows Server 2008 or Windows 7

Unattended Windows Setup answer file in Windows Server 2008 R2 and Windows 7, is an XML file typically called Unattend.xml. This is the answer file for Windows Setup that is created by using Windows System Image Manager (Windows SIM). The answer file enables the configuration of default Windows settings, as well as the addition of drivers, software updates, and other applications.
The unattended Windows Setup answer file in Windows Server 2008 R2 and Windows 7 needs to be specified during the running of SYSPREP. To do so, run the SYSPREP tool with the /unattend:filename option.

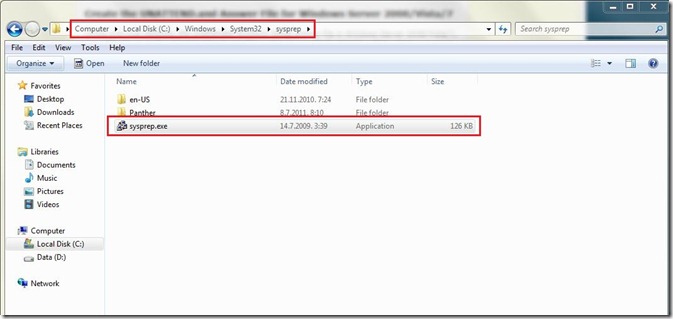
If you wish to manually configure the Windows settings after SYSPREP, run SYSPREP from the C:\Windows\System32\sysprep folder.

1

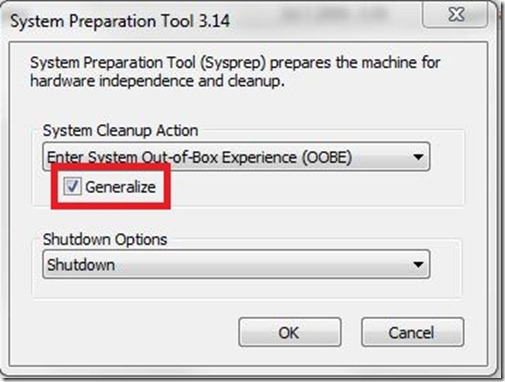
Make sure you do NOT FORGET to select the “Generalize” option if you need to change the computer’s SID. It seems that this version will NOT change the SID unless you pick that option.

2

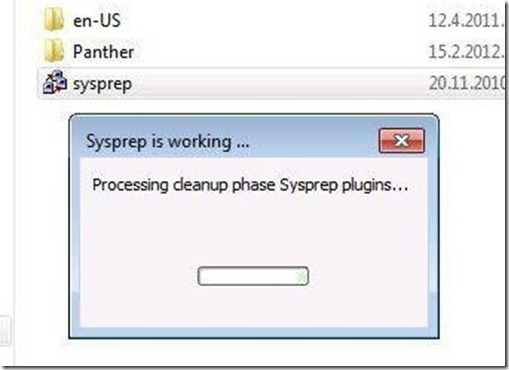
Sysprep is working.

3

When the process is complete the virtual machine will shut down.

OK, our VM is prepared for Cloning and if you want to know how to Clone VM with System Center Virtual Machine Manager read my previous post about that.

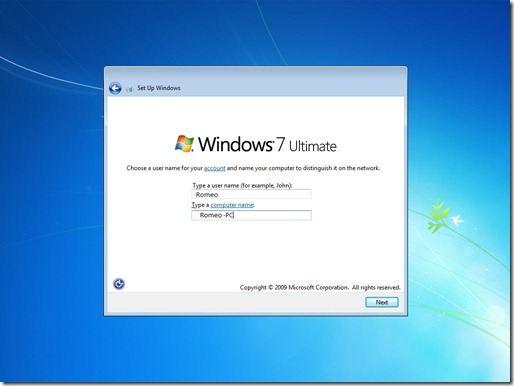
After starting cloned machine, you will be prompted to configure few settings like the user name, computer name, language and some other settings.

4

I need to mention, creating an answer file will greatly ease this process, and the entire process will automatically run.

Folks that’s it!