I believe in Hyper-V!

Windows ServerCategory Archives

Convert single VMware virtual disk (.vmdk) to Hyper-V virtual disk (.vhd) with Microsoft Virtual Machine Converter (MVMC)

In this blog post I’ll explain how to convert .vmdk to .vhd and how to create new Hyper-V virtual machine with converted disk.
What is Microsoft Virtual Machine Converter (MVMC)? The Microsoft Virtual Machine Converter Solution Accelerator is a stand-alone solution for the IT Pro or solution provider who wants to convert VMware based virtual machines to Hyper-V based virtual machines. The MVMC solution can perform full conversion of VMware based virtual machines as well as conversions of VMware virtual disks to Hyper-V virtual disks.
Supported & Free – Quick and easy to download, use and start conversions of VMware VMs
Convert to 2012 – Converts and deploys virtual machines or virtual disks from VMware to Hyper-V hosts including Hyper-V on Windows Server 2012
Scriptable –  Fully scriptable command-line interfaces for performing virtual machine and disk conversions that integrates well with data center automation workflows and Windows PowerShell scripts
OS Support – Supports Windows Server 2008 R2, Windows Server 2008, Windows Server 2003 SP2 and Windows Vista & Windows 7 as well as Windows 8

Microsoft Virtual Machine Converter is a FREE tool! You can download from here.
1

With a GUI we can convert VMware based VMs only if have vCenter server, ESX server, or ESXi server.
2

But, what if I have VMware workstation based VMs? Can I convert these VMs? NO, we can’t convert these VMs on that way but can convert virtual disks (.vmdk) (with CLI) and then can create new VM in Hyper-V.
So, this is detailed how to…

Step 1. Convert .vmdk to .vhd
Open command prompt as administrator and navigate to

C:\Program Files (x86)\Microsoft Virtual Machine Converter Solution Accelerator>mvdc.exe “sourcedisk\vmdkdisk\vmdisk.vmdk” “destinationdisk\newvhddisk\newvhd.vhd” press Enter.

3

Step 2. Create Hyper-V virtual machine with converted virtual disk

4

And voila, we have Hyper-V virtual machine up & running ;)

5

MVMC Capabilities

  • Converts VMware VMs to Hyper-V VMs
  • Supports converting to WS2012 Hyper-V
  • Wizard Driven UI for conversion
  • Includes CLI for VM and virtual disk conversion
  • Supports offline conversion of .vmdk to .vhd
  • Removes VMware tools for a clean migration
  • Installs Hyper-V integration services

This isn’t only way for conversion, we can do that in a few ways, but it is one of the simplest.

Enjoy the day!

Install the Hyper-V Role in Windows Server 2012 R2 and configure Virtual Switches with PowerShell

Hi to all! In this blog post I’ll describe how to install Hyper-V Role and how to configure Virtual Switches with PowerShell.
With PowerShell we are faster than with GUI, especially if we do in enterprises. And, of course, PowerShell is the coolest then GUI is ;).

Step 1.

Open PowerShell as administrator and type command below and press Enter:

Install-WindowsFeature –Name Hyper-V -IncludeManagementTools -Restart
2

After the server restarts open command prompt and type virtmgmt.msc. Hyper-V console will appear.

3

Step 2.

Now we need to configure virtual switches. On the Hyper-V host machine I have four physical network adapters. One network adapter is dedicated for Hyper-V host management and the other three will be for a virtual machines. All three network adapter will be external virtual switches.
First I want see which network adapter have available on the Hyper-V host.
Open PowerShell as administrator and type command:

Get-NetAdapter

4 
I’ll use Ethernet 2, 3 and 4 as virtual switches on the Hyper-V host.

Step 3.

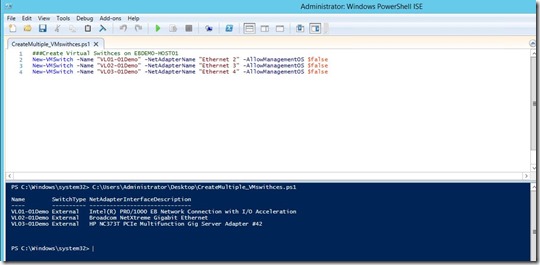
Open PowerShell ISE as administrator and type following commands:

New-VMSwitch -Name “VmSwitch name” -NetAdapterName “Physical NIC Name
-AllowManagementOS $false

6

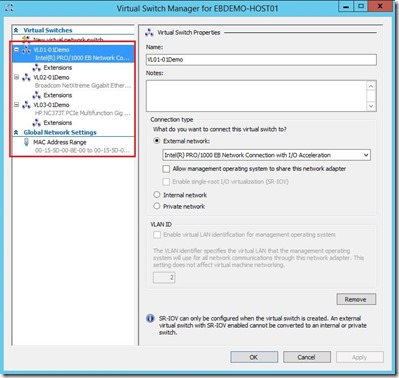
Now we have Virtual Switches on our Hyper-V host.

7

We can see Virtual Switches when open Virtual Switch Manager console.

8

This is very simple PowerShell usage, but I hope that it will help someone ;)
If we want to create Virtual Switches to multiple Hyper-V hosts or if we want to do something else with Virtual Switches just need to use different syntax in PowerShell.

Enjoy the day!

Install Microsoft .Net Framework 3.5 “offline” in Windows 8

Many times until now I had issues with .Net Framework 3.5 installation on Windows 8. Every time when I installed .Net Framework 3.5 on Windows 8 I needed to bing-it to find resolution, so now I want to have reminder on my blog :).

Why do we need .Net Framework 3.5? Sometimes we use some updated program, Apps, etc. (Last time when I had a problem I installed Team Foundation Server 2012 Build server). To install it online we have to do a huge amount of download from Internet (if you have a lucky with this kind of installation, I didn’t have).

Step 1.

Insert Windows 8 boot media into PC
Capture3

Step 2.

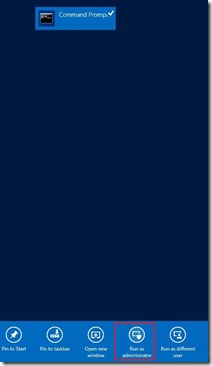
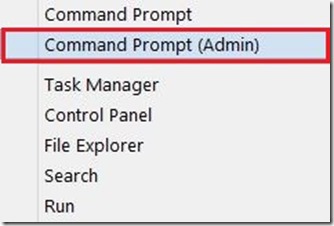
Open Command Prompt (Run as administrator) or (Admin)
Capture4 Capture5

Step 3.

Copy the following line and paste on to Command Prompt (opened with Admin rights) window then press Enter.

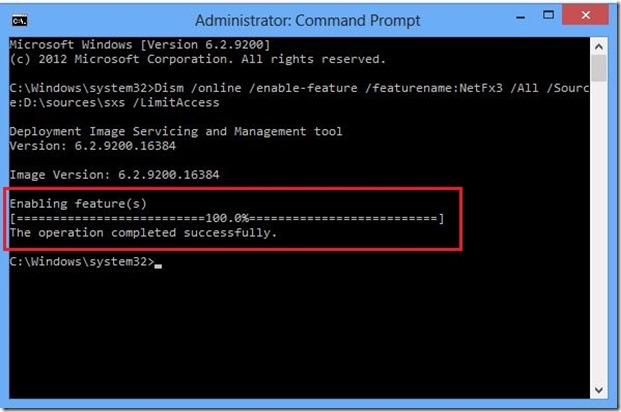
Dism /online /enable-feature /featurename:NetFx3 /All /Source:D:\sources\sxs /LimitAccess

Capture

After very short time you’ll have .Net Framework 3.5 installed on your PC.

Capture2

NOTE: Why this is happening? Actually, when we install .Net Framework 3.5 through Windows 8 features, Turn Windows features on or off, Windows needs to download .Net Framework files. But, when we have WSUS on our domain Windows requires this files from WSUS not from Windows online updates, given that WSUS doesn’t have such files in the repository and we get error when try to install .Net Framework.

Enjoy ;)

Romeo